Commercial License Poll

The poll has a drop-down menu but the arrow doesn't show because it's too wide. The menu will come up if you click on the answer box.

Would you like me to offer commercial licenses?
pollcode.com free polls

Wednesday, November 26, 2008

Happy Thanksgiving!

I'm sorry it's been awhile since my last post. I've been really busy with school. But I'm back with a few templates for you. Just in time for Thanksgiving!

Here are three 8.5x11 templates:


And here is one 12x12 template:


I hope you all have a great Thanksgiving!

Saturday, November 15, 2008

Questions and Requests

In response to your question, Myxi, I may not be converting Template 20. The only difference really between 19 and 20 is the circle photos are larger in Template 20. I tried making larger circles in an 8.5x11 template, but it just didn't come out right. I might try again sometime in the future, but I'm just leaving it alone for right now.

I saw on the 2Peas message board yesterday that someone was looking for a template for a Christmas card. She wanted to be able to have room for six smaller photos of individuals and one larger group photo. I thought I would help out as it seemed like a quick little project. It could also be used for 4x6 mini albums or brag books.

Here's the template:


Hope you enjoy the template!

Friday, November 14, 2008

Catching Up

I'm trying to catch up on my 8.5x11 layouts. I want to get to the point where I can release both
12x12 and 8.5x11 versions of a template at the same time. Don't worry, I will still be releasing new 12x12 templates. But until I am caught up, 8.5x11 templates will be what I concentrate on creating.

Here are three more converted 8.5x11 templates.


Monday, November 10, 2008

Three for All

I have two 8.5x11 and one 12x12 templates for you today. I had a tough time converting Templates 24 and 25 into 8.5x11. It took me several tries, but I finally got it to where I'm happy with it. Template 35 has room for three 4x6 photos and sixteen 1.5x1.5 photos. I think it would be good for pages on vacations or parties.

Here's what they look like:


Minor Updates

I've updated my blog so that you may reach download pages by clicking on the preview images. I will be back tomorrow with a few more freebies, so be sure to visit!

Wednesday, November 5, 2008

Examples and Revisions

I wanted to share with you a couple of layouts people have created using my templates.

In this first one, I like how Amber rotated the template 90 degrees clockwise. She also combined the spots for a smaller photo and the journaling to make a spot for larger photo.
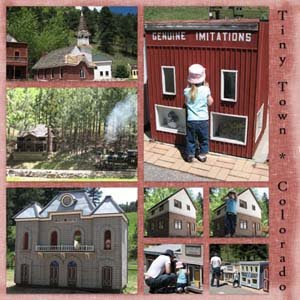


Tiny Town, Colorado
Template: LinasLayouts_Template034

The second layout was created by Tammy. I like how the orange title mirrors the orange of the inner tube and T-shirt. I also like how the background gives the impression of water. It goes well with the page theme.


Summer 2008
Template: LinasLayouts_Template016a
Background: by Erica Hernandez at Two Peas in a Bucket

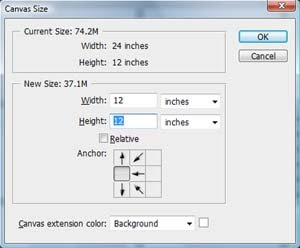
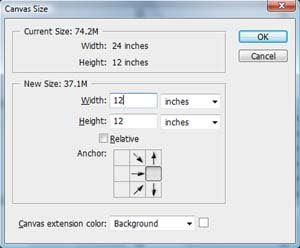
I also had a request for screenshots of how to print pages made with Template 33 (a two-page layout). These are screenshots from Adobe Photoshop CS3. I don't have Photoshop Elements, but I'm hoping they are fairly similar. I didn't take screenshots of everything. I only included the program windows that I thought might be confusing.

When you are done with your layout, flatten your image. To prevent overwriting the layered file, save this flattened image as a jpg (or whatever image file you usually use). Press Alt+Ctrl+C to adjust the canvas size. Set the width to 12 inches and keep the height the same. To set the anchor, click on the arrow pointing directly to the left. The window should look like this:


Click OK and the following window will come up:


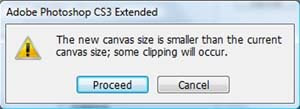
Click Proceed. You should now have an image with just the left side of your layout. You can save this new image as its own file if you would prefer to have the left and right pages separate. You can also resize the image to 8 inches square if you print 8x8 pages.

To get the right side of the layout, follow the same steps from above except this time set the anchor by clicking on the arrow pointing directly right. This is what the window should look like:


Click on OK. Click on Proceed in the window that comes up. You should have an image with just the right side of your layout. Save as a new file if desired. That's it!

If you are wanting to only make a one-page layout, Template 33 doesn't work very well because of the photo overlap between the two pages. So I've adjusted it a little to make a one-page version. Here's what it looks like:

Saturday, November 1, 2008

One and a Two

Three freebies for you today. One 12x12 and two 8.5x11 templates. The 8.5x11 layouts are (as usual) converted from previous 12x12 layouts. They are basically the same except for the size of the photos. The new 12x12 layout is based off a page in a catalog. I've liked several of the layouts in this catalog, so if I have time I will be creating more from it.

Here are the templates: